> ## Documentation Index
> Fetch the complete documentation index at: https://docs.cloud.red/llms.txt
> Use this file to discover all available pages before exploring further.
# Hyper-V Agent Onboarding
> Hyper-V Agent Onboarding overview
## Requirements
* Must have access to Cloud.Red platform and permissions to download the needed VM template
* Must be able to upload the VM template to Hyper-V environment
* Must be able to create a virtual machine in the Hyper-V environment
* Must be able to access the created virtual machine’s console in the Hyper-V environment
* Must have the needed firewall rules deployed allowing access to the internet, access to your managed devices, etc…
* Must have the agent names provided to you by your project manager
**Note:\
The IP address must not be deployed to BIGIP management subnets or BIGIP data plane subnets.\
Each agent can consist of up to 10 BIGIPs to be managed.\
Optimally, the number of agents to be deployed would be equivalent to the number of zones such that traffic to/from the agent to/from F5 devices does not have to traverse WANs nor firewalls.\
NOTE - all members of a sync group must all be reachable from the same agent**
***
## Cloud.Red Agent Deployment
* Download the OVA file via the agents tab in cloud.red
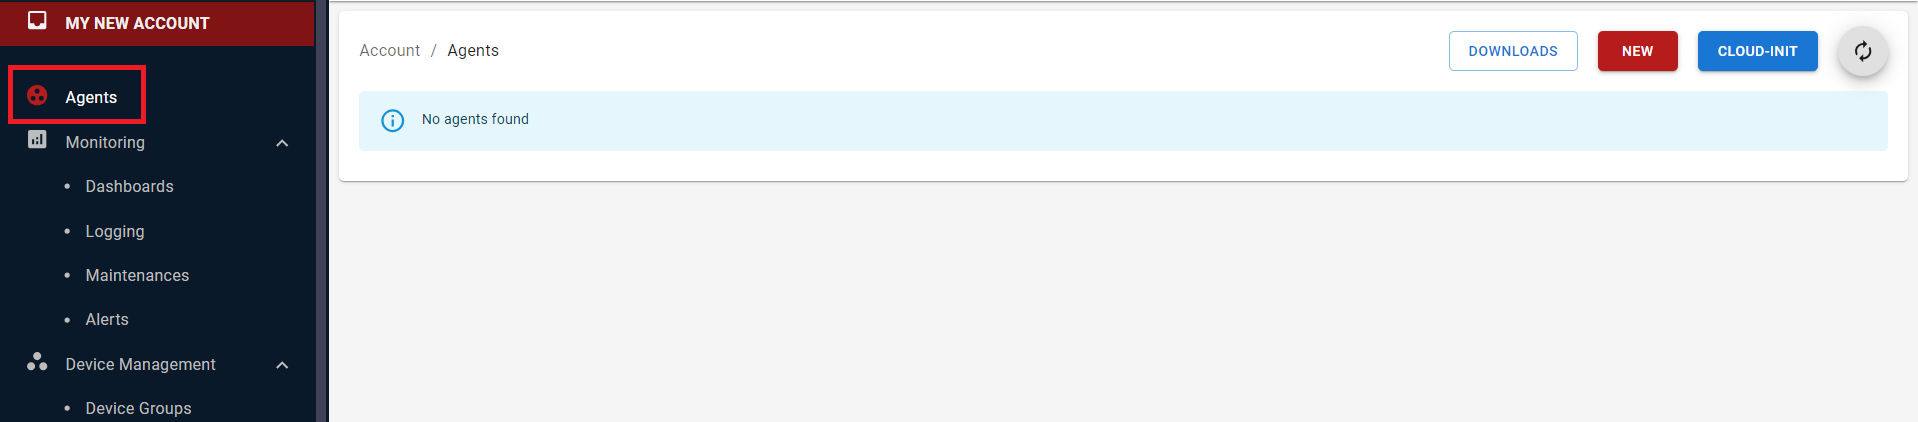
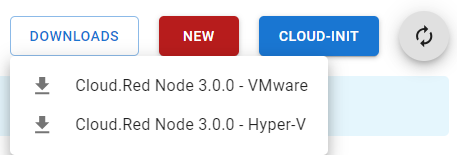
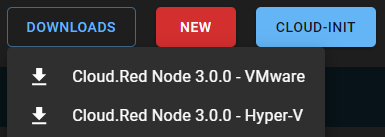
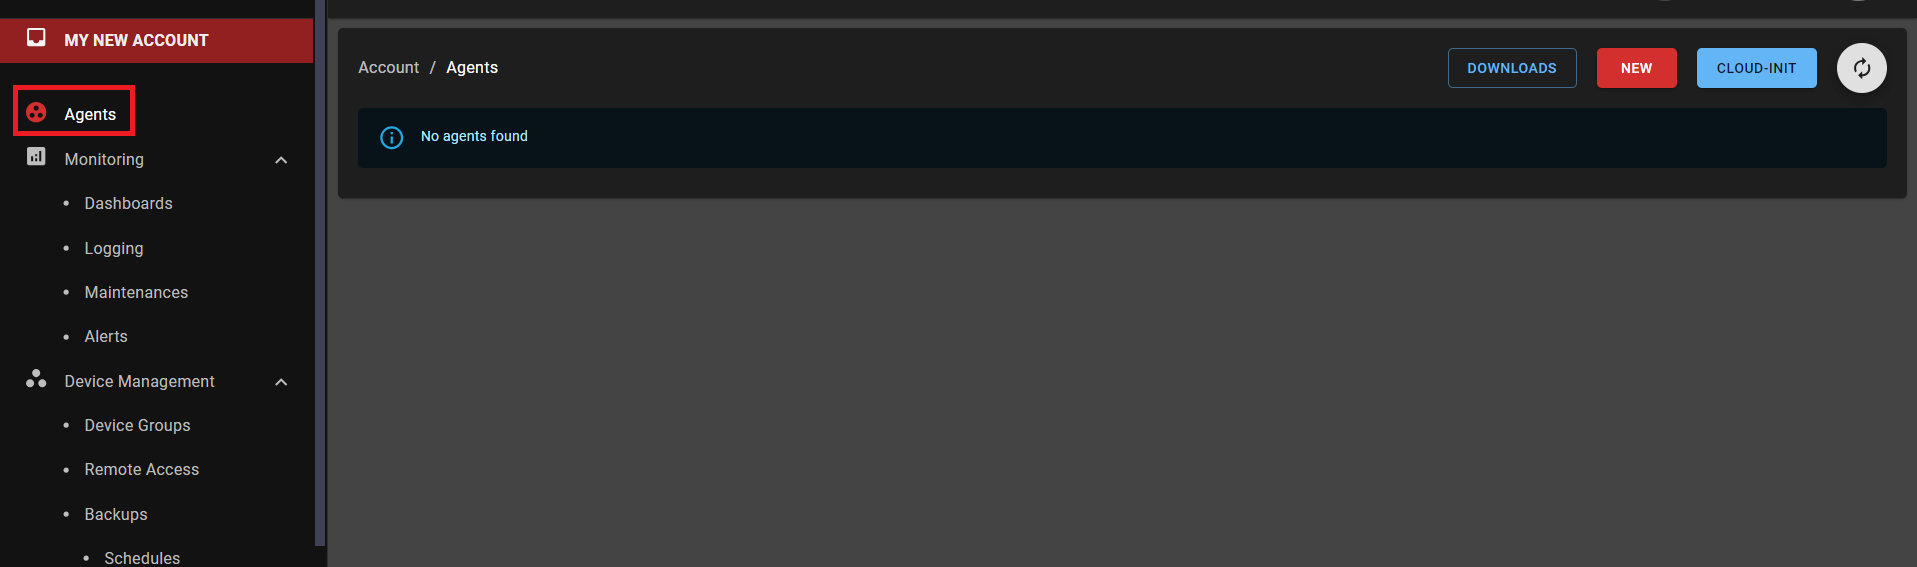 * Select downloads in the upper-right hand corner and be sure to select the OVA file
 ### Deploy the VM template to your Hyper-V environment
* The VM template needs to be uploaded to the Hyper-V server, unzipped, and used to create the virtual machine
* When importing, it is suggested that you select the “create a new unique ID” option in the wizard.
### Deploy the VM template to your Hyper-V environment
* The VM template needs to be uploaded to the Hyper-V server, unzipped, and used to create the virtual machine
* When importing, it is suggested that you select the “create a new unique ID” option in the wizard.
 ### Power on the virtual appliance
* The virtual machine is now ready to be powered on.
***
## Menu Shell
* Access the VMware console for the virtual machine
* Provide the credentials listed below
> User: netadmin\
> Default Password: Will be provided by WTIT
**Note:** We strongly advise updating the default password for the 'netadmin' user to enhance security.
### Power on the virtual appliance
* The virtual machine is now ready to be powered on.
***
## Menu Shell
* Access the VMware console for the virtual machine
* Provide the credentials listed below
> User: netadmin\
> Default Password: Will be provided by WTIT
**Note:** We strongly advise updating the default password for the 'netadmin' user to enhance security.
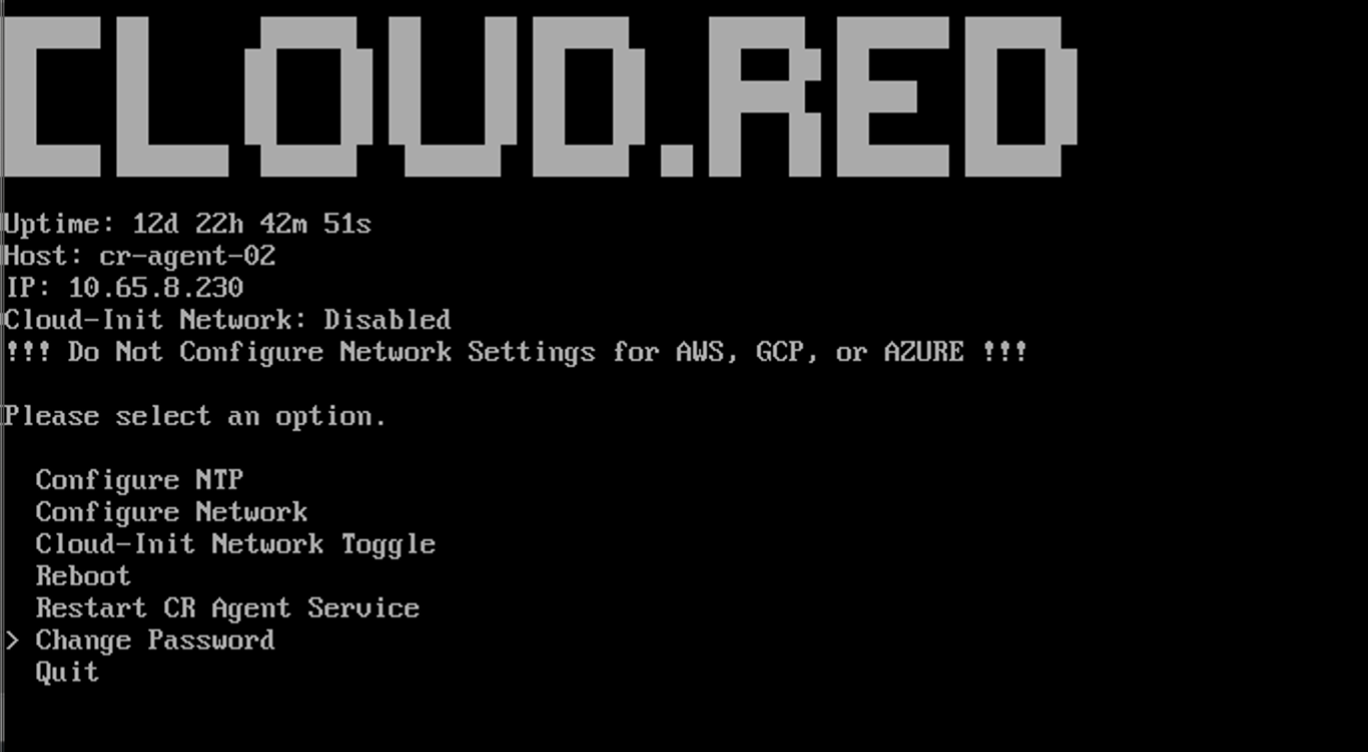
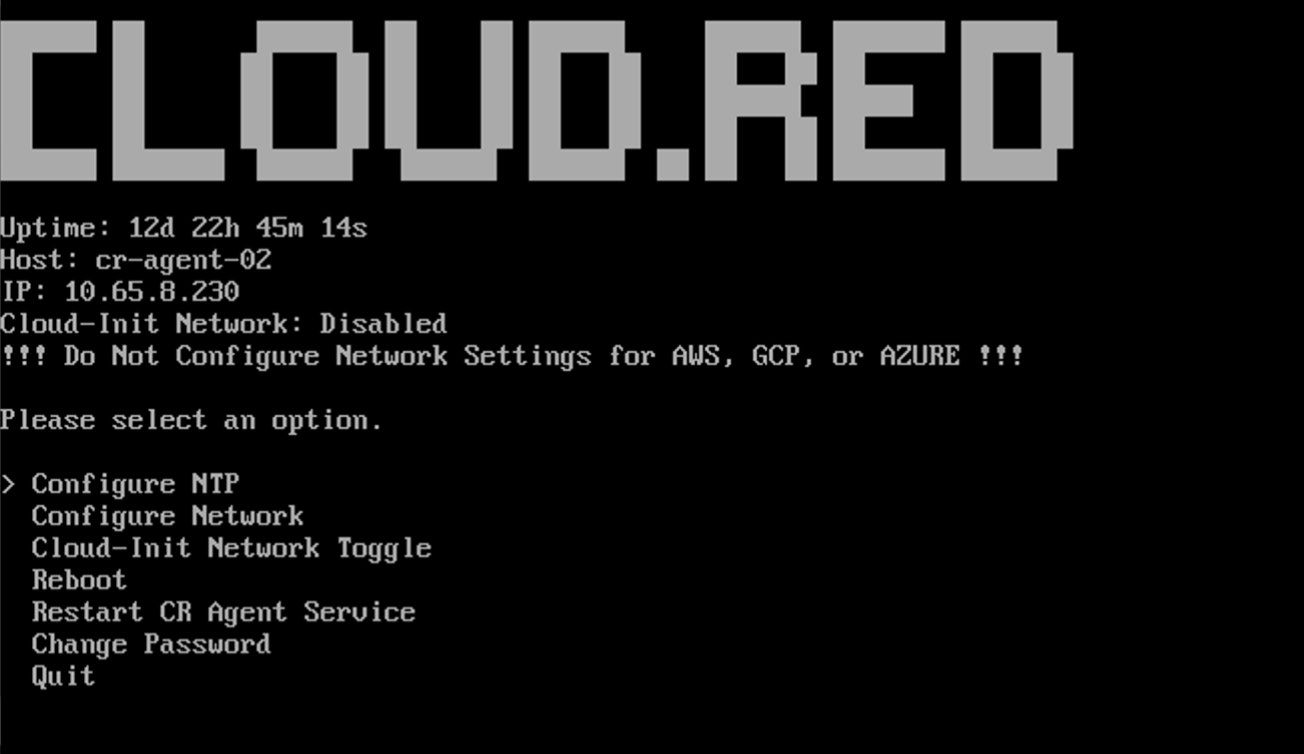 The GUI menu provides a way for users to:
* **Configure NTP:** The Network Time Protocol (NTP) is a standard protocol used to synchronize computer clock times in a network. The "Configure NTP" option in the GUI menu allows users to set up or modify the NTP servers that the device will use to sync its internal clock.
* **Configure Network:** This option provides users the ability to set or modify network parameters like IP addresses, subnet masks, gateways, and hostname.
**Disclaimer:** If you are operating within AWS, Azure, or GCP environments, do NOT configure network settings!!! Any changes could lead to connectivity or functionality issues.
* **Cloud-Init Network Toggle:** The "Toggle Cloud-Init Network settings" option allows users to enable or disable the Cloud-Init's network configuration settings.
**Disclaimer:** If you are operating within AWS, Azure, or GCP environments, do NOT modify this cloud-init setting!!! Any changes could lead to connectivity or functionality issues.
* **Reboot:** This option allows users to safely restart the device.
* **Change Password:** This option allows users to modify the password for the "netadmin" user profile.
* **Quit:** This option allows users to exit the menu, and log out of the “netadmin” user.
Select the expands below for more information on each action.
**Note:** Once the agent has been onboarded into cloud.red, only change NTP configuration at the instruction of WorldTech IT.
The GUI menu provides a way for users to:
* **Configure NTP:** The Network Time Protocol (NTP) is a standard protocol used to synchronize computer clock times in a network. The "Configure NTP" option in the GUI menu allows users to set up or modify the NTP servers that the device will use to sync its internal clock.
* **Configure Network:** This option provides users the ability to set or modify network parameters like IP addresses, subnet masks, gateways, and hostname.
**Disclaimer:** If you are operating within AWS, Azure, or GCP environments, do NOT configure network settings!!! Any changes could lead to connectivity or functionality issues.
* **Cloud-Init Network Toggle:** The "Toggle Cloud-Init Network settings" option allows users to enable or disable the Cloud-Init's network configuration settings.
**Disclaimer:** If you are operating within AWS, Azure, or GCP environments, do NOT modify this cloud-init setting!!! Any changes could lead to connectivity or functionality issues.
* **Reboot:** This option allows users to safely restart the device.
* **Change Password:** This option allows users to modify the password for the "netadmin" user profile.
* **Quit:** This option allows users to exit the menu, and log out of the “netadmin” user.
Select the expands below for more information on each action.
**Note:** Once the agent has been onboarded into cloud.red, only change NTP configuration at the instruction of WorldTech IT.
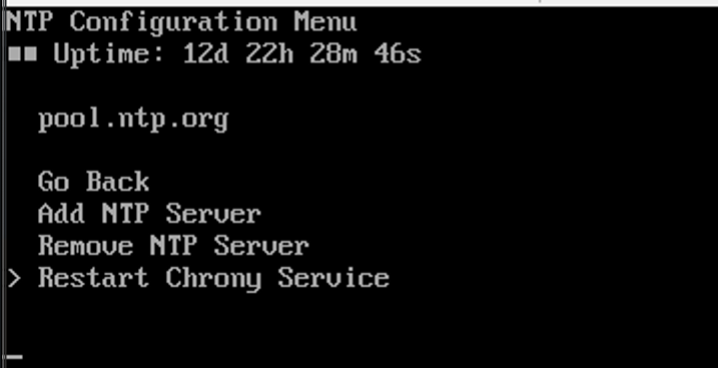
To Configure NTP, consult the following:
**Access Configure NTP from the main menu**\
Use the arrow keys to navigate through the available options on the main menu.\
Highlight the "Change Password" option and press 'Enter' to select it.
The option to configure the Network Time Protocol (NTP) settings for the device or to ensure synchronized and accurate time settings are available.
Select the tab of the action to be performed.
Permits the addition of a new NTP server address.
* Select "Add NTP Server"
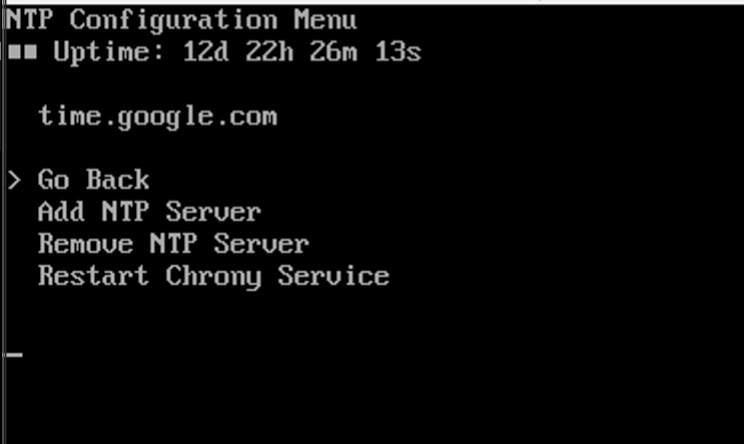 * Confirm the addition by pressing "Enter".
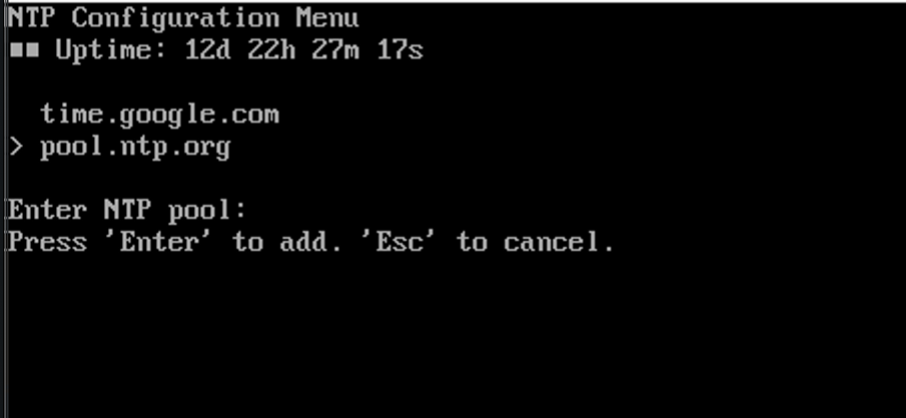 To cancel without adding, press the "Esc" key.
Permits the removal of an already configured NTP server.
* Select "Remove NTP Server"
The list of currently added NTP servers is shown.
To cancel without adding, press the "Esc" key.
Permits the removal of an already configured NTP server.
* Select "Remove NTP Server"
The list of currently added NTP servers is shown.
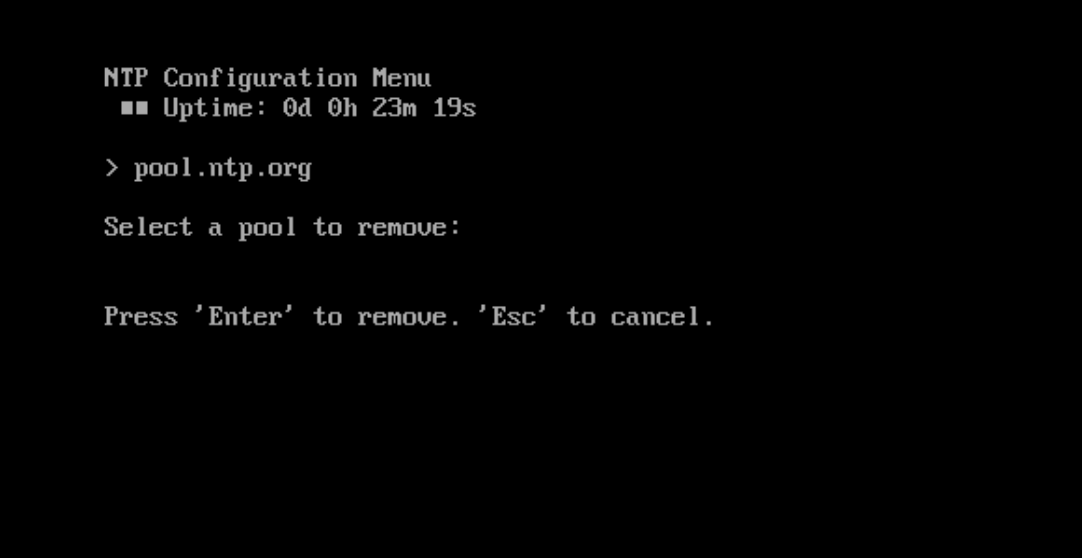 * Choose the server to remove
* Confirm removal by pressing "Enter".
To cancel without removing, press the "Esc" key.
***
**Warning:** After modifying NTP settings, the option to restart the Chrony service must be selected.\
This facilitates the synchronization of the device's time based on the new NTP settings.
* Select "Restart Chront Service"
* Choose the server to remove
* Confirm removal by pressing "Enter".
To cancel without removing, press the "Esc" key.
***
**Warning:** After modifying NTP settings, the option to restart the Chrony service must be selected.\
This facilitates the synchronization of the device's time based on the new NTP settings.
* Select "Restart Chront Service"
 After saving the NTP configurations and restarting the Chrony service, users will be redirected back to the main menu, displaying the device's uptime, IP address, and available network settings and configuration options.
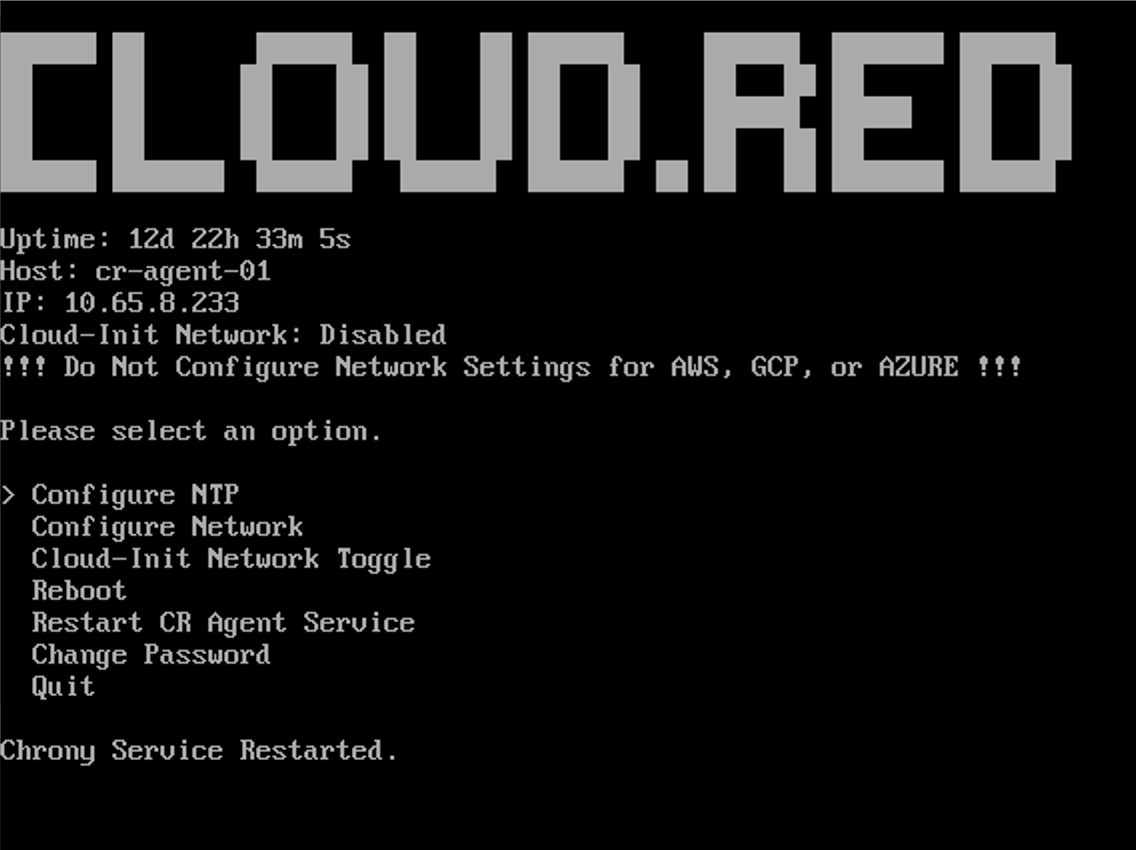 To return to the main menu without making any changes, select go back.
**Note:** Cloud-init must be disabled to make changes to the network configuration.\
Users are expected to provisions the configurations provided to Worldtech IT as well as update the host name with the name provided by Worldtech IT.\
Once the agent has been onboarded into cloud.red, only change Network configuration at the instruction of WorldTech IT.
To return to the main menu without making any changes, select go back.
**Note:** Cloud-init must be disabled to make changes to the network configuration.\
Users are expected to provisions the configurations provided to Worldtech IT as well as update the host name with the name provided by Worldtech IT.\
Once the agent has been onboarded into cloud.red, only change Network configuration at the instruction of WorldTech IT.
 ***
To Configure Network, consult the following:
* In the main menu, navigate using the arrow keys to the option that says "Configure Network"
* Select it by pressing the 'Enter' key on your keyboard.
Accessing the "Configure Network" option will lead you to the Network Manager UI.
***
To Configure Network, consult the following:
* In the main menu, navigate using the arrow keys to the option that says "Configure Network"
* Select it by pressing the 'Enter' key on your keyboard.
Accessing the "Configure Network" option will lead you to the Network Manager UI.
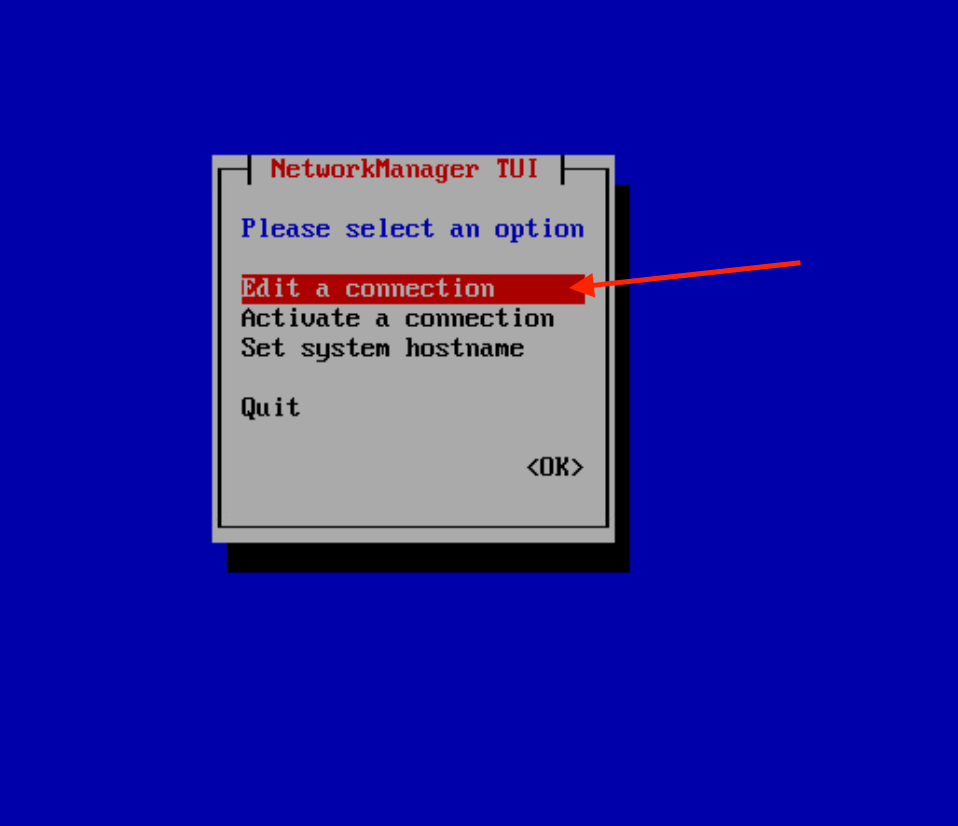 The following options are available:
* **Edit a connection:** Modify existing network configurations.
* **Activate a connection:** Start a specific network connection.
* **Set system hostname:** Rename your system for identification on the network.
* **Quit:** Return to the Network menu.
Select the tab of the action to be performed.
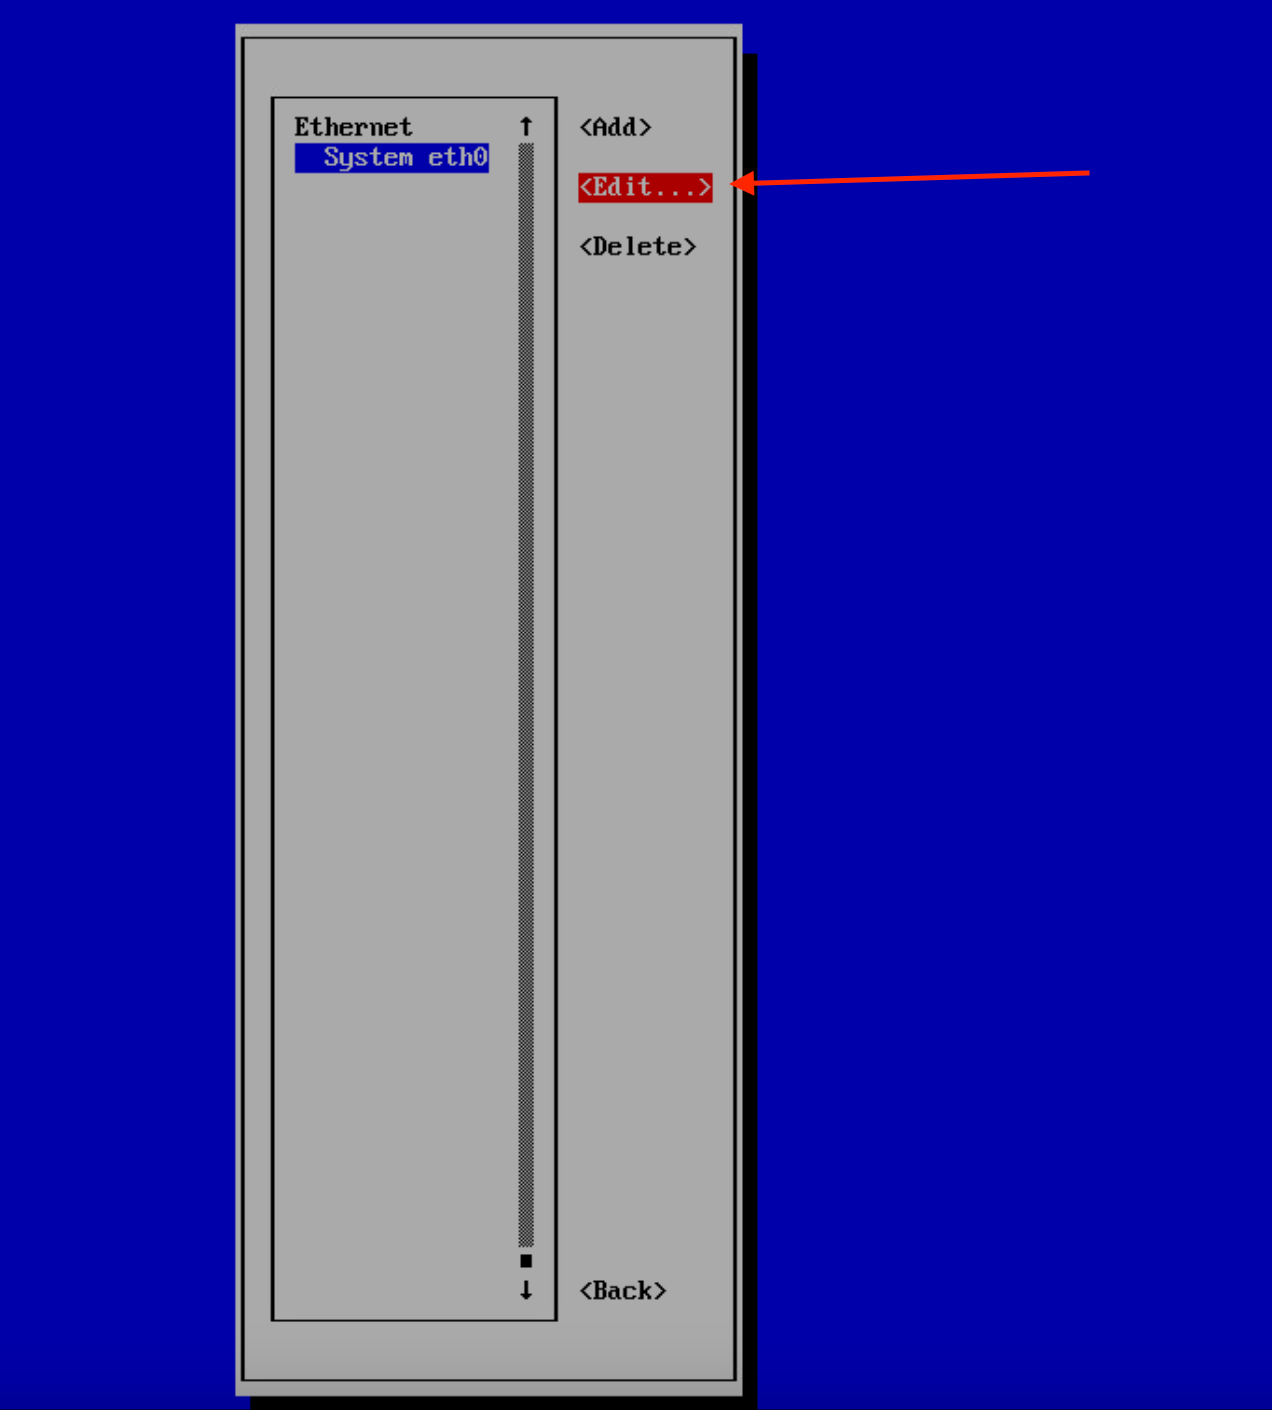
* Navigate to "Edit a connection" and press "enter"
* A list of available network connections will be presented.
In this example, there's an "Ethernet" connection labeled "System eth0". Here are the available actions:
* **Add:** Create a new network connection.
* **Edit:** Modify the selected network connection's settings.
* **Delete:** Remove the selected network connection.
* **Back:** Return to the previous menu.
Select “Edit”, and press “Enter”.
The following options are available:
* **Edit a connection:** Modify existing network configurations.
* **Activate a connection:** Start a specific network connection.
* **Set system hostname:** Rename your system for identification on the network.
* **Quit:** Return to the Network menu.
Select the tab of the action to be performed.
* Navigate to "Edit a connection" and press "enter"
* A list of available network connections will be presented.
In this example, there's an "Ethernet" connection labeled "System eth0". Here are the available actions:
* **Add:** Create a new network connection.
* **Edit:** Modify the selected network connection's settings.
* **Delete:** Remove the selected network connection.
* **Back:** Return to the previous menu.
Select “Edit”, and press “Enter”.
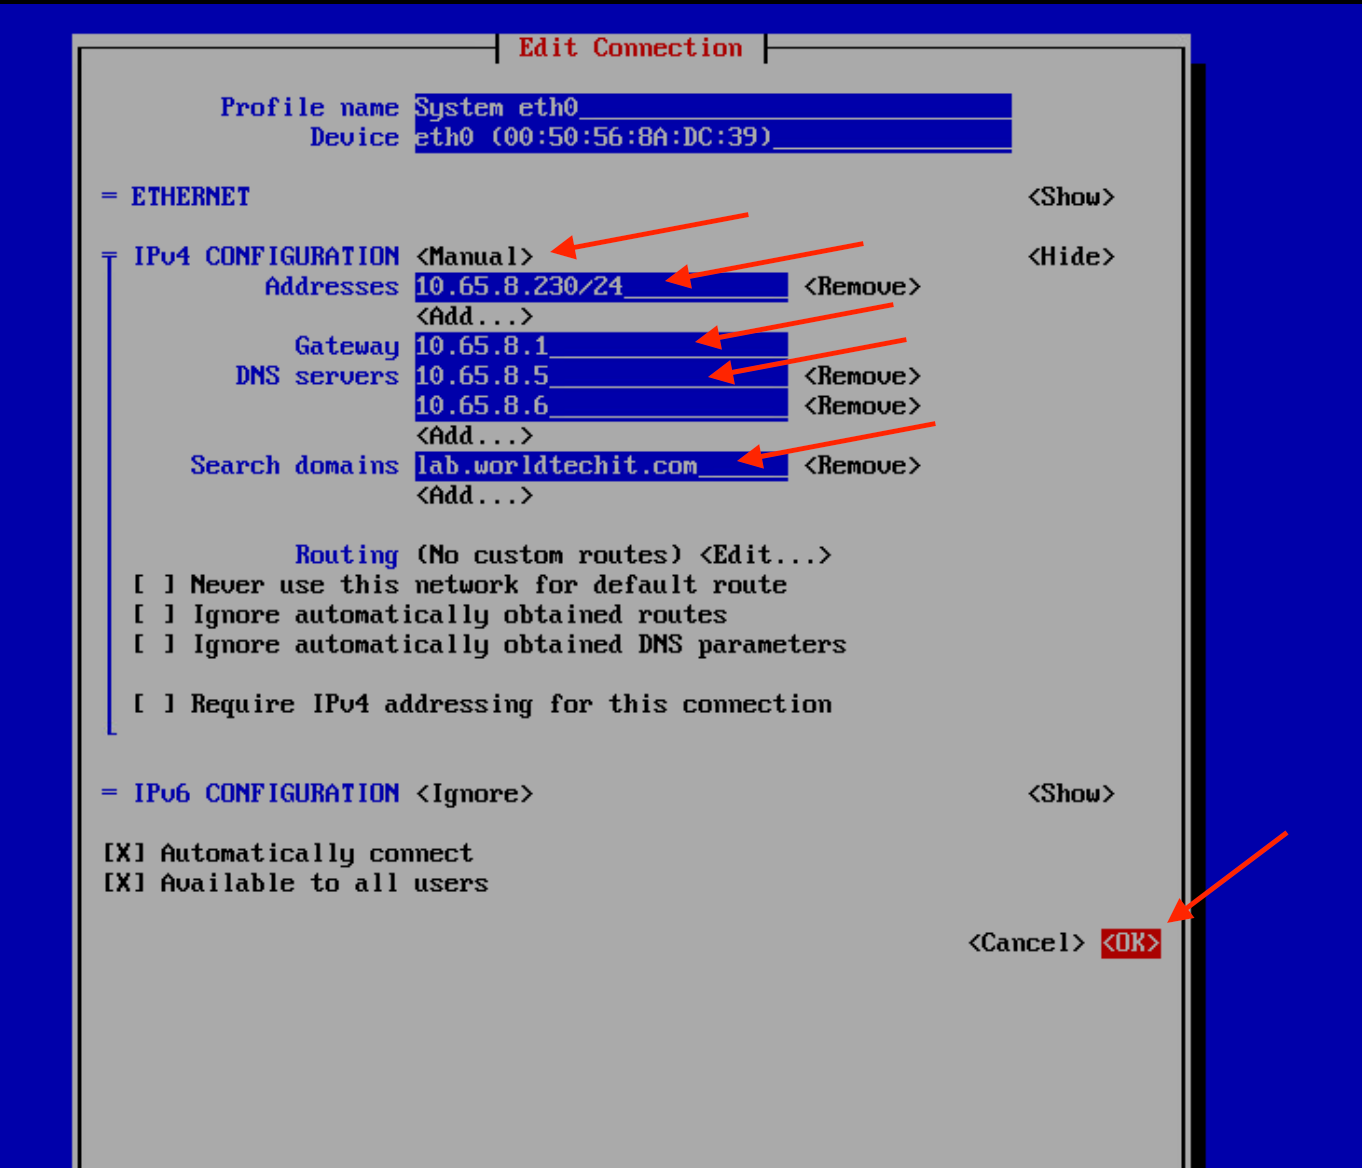
 IPv4 Configuration: Settings related to IPv4 protocol.\
Change Configuration Mode: Initially, it might be set to "Automatic." Change this to "Manual" to manually input the IP details.
* Address: IP address for the device.
* Gateway: IP address for the gateway.
* DNS servers: Domain Name System servers' IP addresses.
* Search domains: Domains to search when resolving hostnames.
* Routing: Settings related to data routing.
Make the necessary changes and click "OK" to save.
IPv4 Configuration: Settings related to IPv4 protocol.\
Change Configuration Mode: Initially, it might be set to "Automatic." Change this to "Manual" to manually input the IP details.
* Address: IP address for the device.
* Gateway: IP address for the gateway.
* DNS servers: Domain Name System servers' IP addresses.
* Search domains: Domains to search when resolving hostnames.
* Routing: Settings related to data routing.
Make the necessary changes and click "OK" to save.
 After confirming the network settings you will be navigated back to Edit a connection menu.
* Navigate to “Back” to go back to the main menu in the NetworkManager TUI.
**Note:** In order for the changes to take effect, users will need to deactivate and reactivate the connection for the changes to be applied.\
More information can be found in the activate connection tab above.
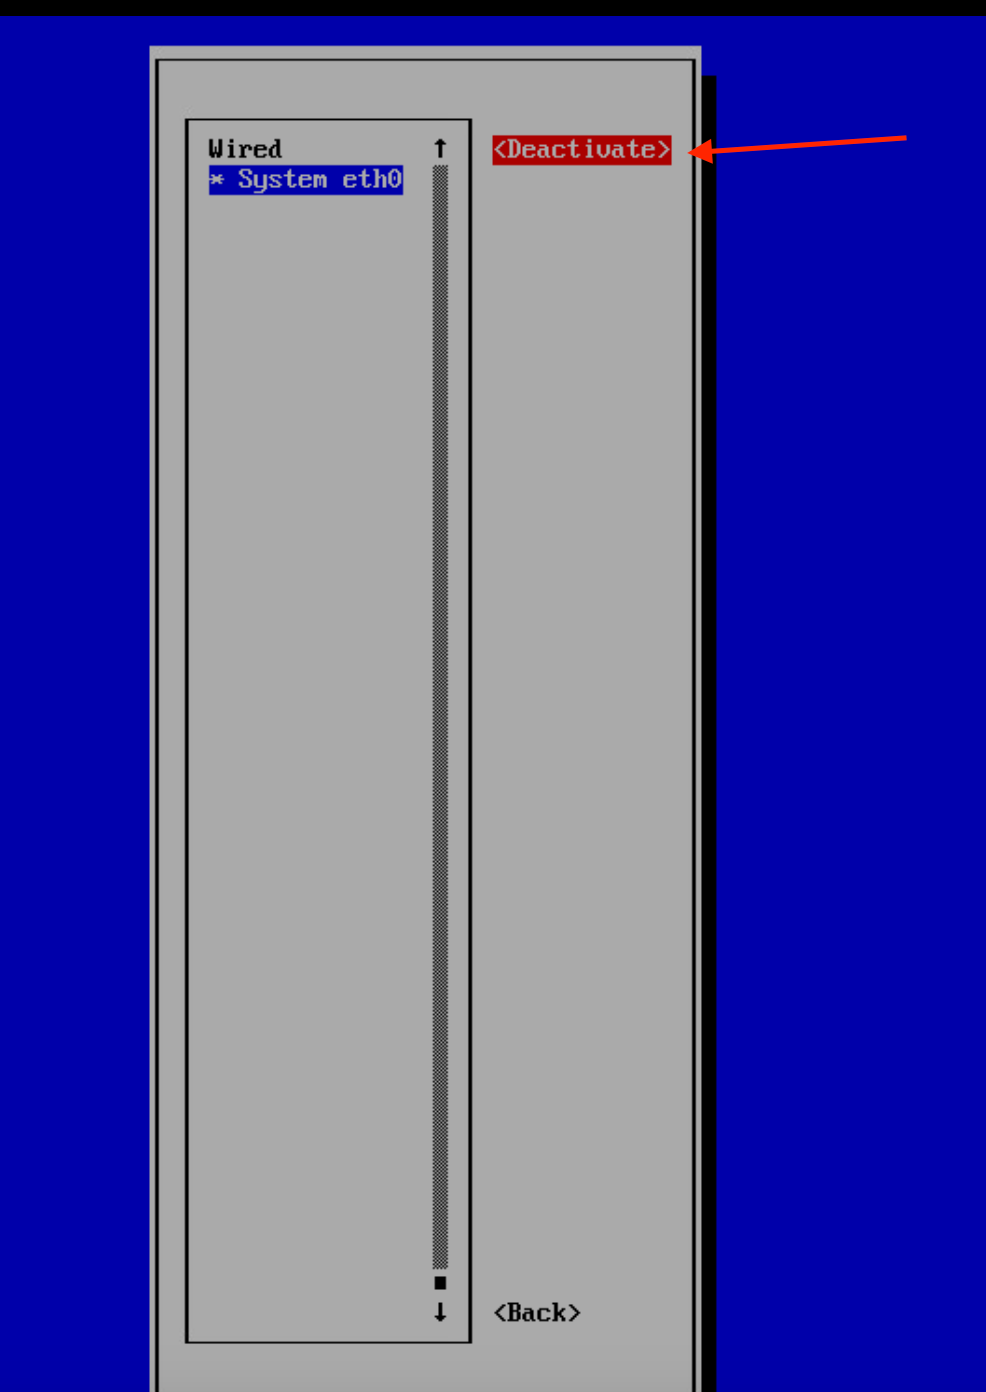
* Navigate to “Activate a connection” and press "enter"
* A list of available network connections will be presented.
In this example, there’s an “Ethernet” connection labeled “System eth0”. Here are the available actions:
* Activate
* Deactivate
Navigate to the connection with the provisioned IP address, gateway, and DNS servers that were provided to Worldtech IT
**Note:** Users must first configure the connection using "Edit a connection"
Navigate to “Deactivate” and press “Enter”
After confirming the network settings you will be navigated back to Edit a connection menu.
* Navigate to “Back” to go back to the main menu in the NetworkManager TUI.
**Note:** In order for the changes to take effect, users will need to deactivate and reactivate the connection for the changes to be applied.\
More information can be found in the activate connection tab above.
* Navigate to “Activate a connection” and press "enter"
* A list of available network connections will be presented.
In this example, there’s an “Ethernet” connection labeled “System eth0”. Here are the available actions:
* Activate
* Deactivate
Navigate to the connection with the provisioned IP address, gateway, and DNS servers that were provided to Worldtech IT
**Note:** Users must first configure the connection using "Edit a connection"
Navigate to “Deactivate” and press “Enter”
 Navigate to “Activate” and press “Enter”
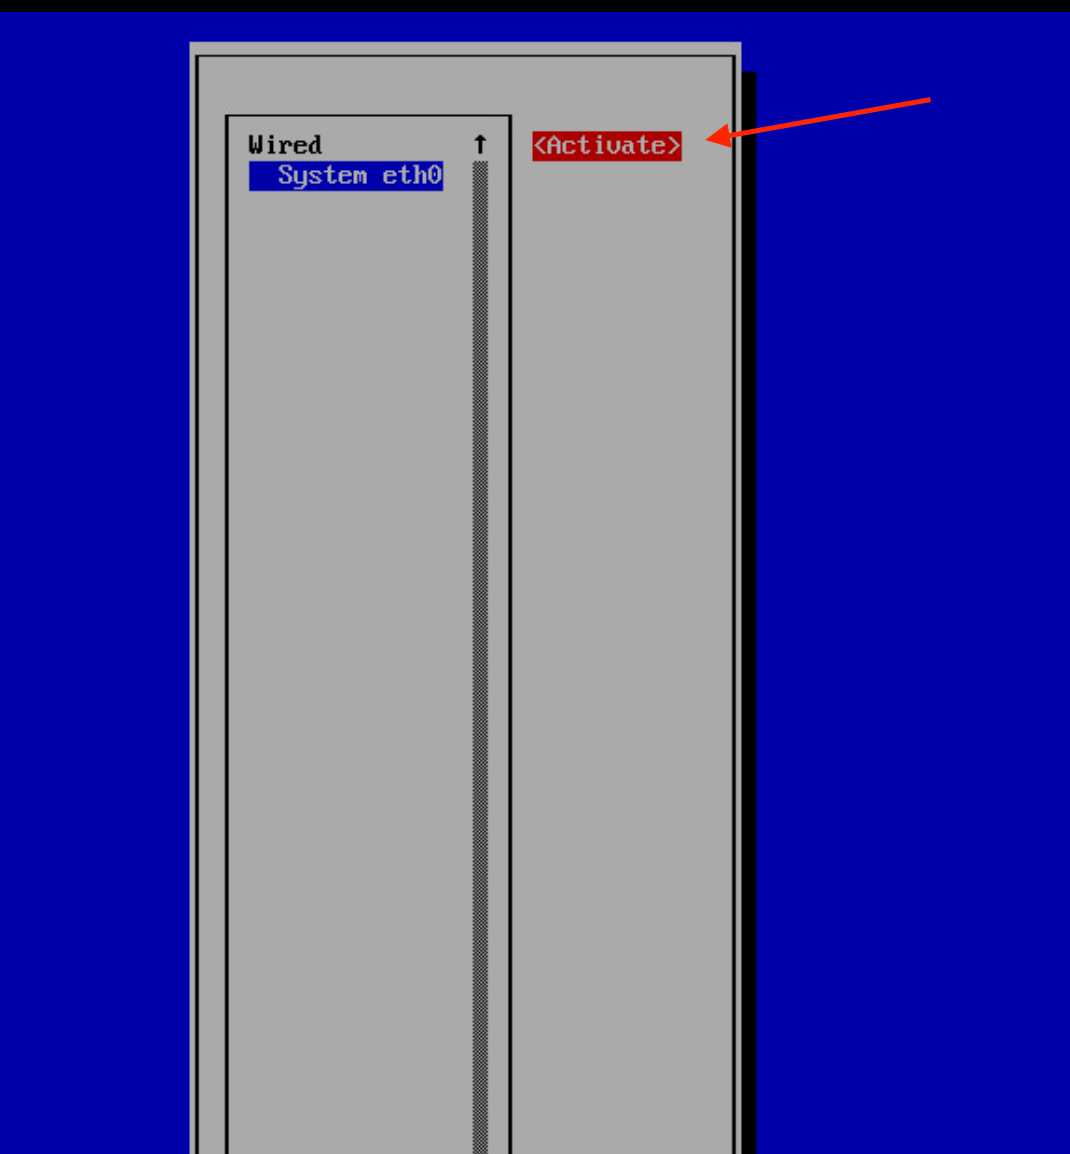 Once the network has been deactivated, and reactivated select “Back” to go back to the NetworkManger TUI main menu.
* Navigate to “Set system hostname” and press "enter"
* A screen to enter the new host name will be presented.
During the onboarding process Worldtech IT will provide the name of each agent that is expected to be onboarded. set-hostname.png
Once the network has been deactivated, and reactivated select “Back” to go back to the NetworkManger TUI main menu.
* Navigate to “Set system hostname” and press "enter"
* A screen to enter the new host name will be presented.
During the onboarding process Worldtech IT will provide the name of each agent that is expected to be onboarded. set-hostname.png
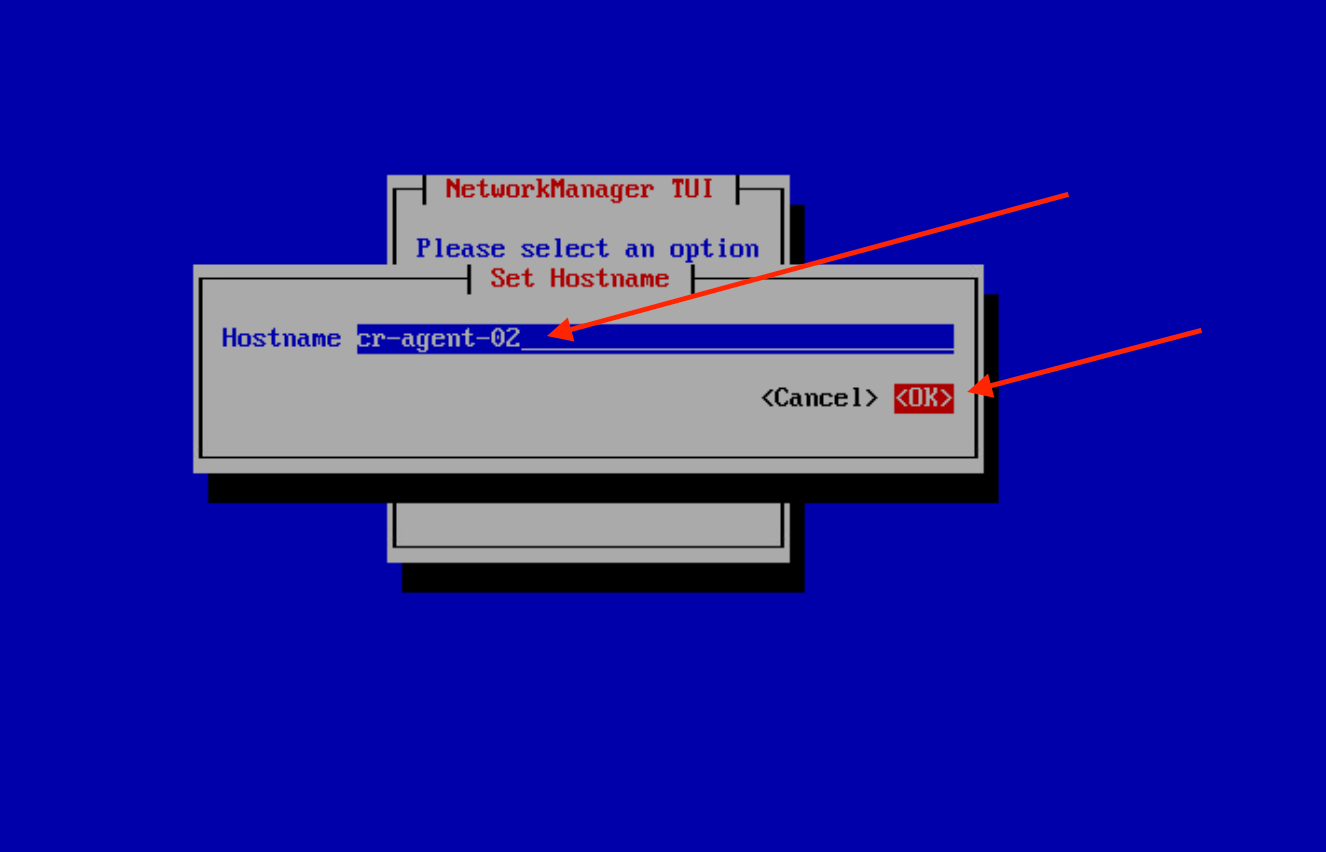 After entering the hostname and selecting "OK" a confirmation window that says "Set hostname to '\[your-chosen-hostname]'" will be displayed.
* Select "OK"
After entering the hostname and selecting "OK" a confirmation window that says "Set hostname to '\[your-chosen-hostname]'" will be displayed.
* Select "OK"
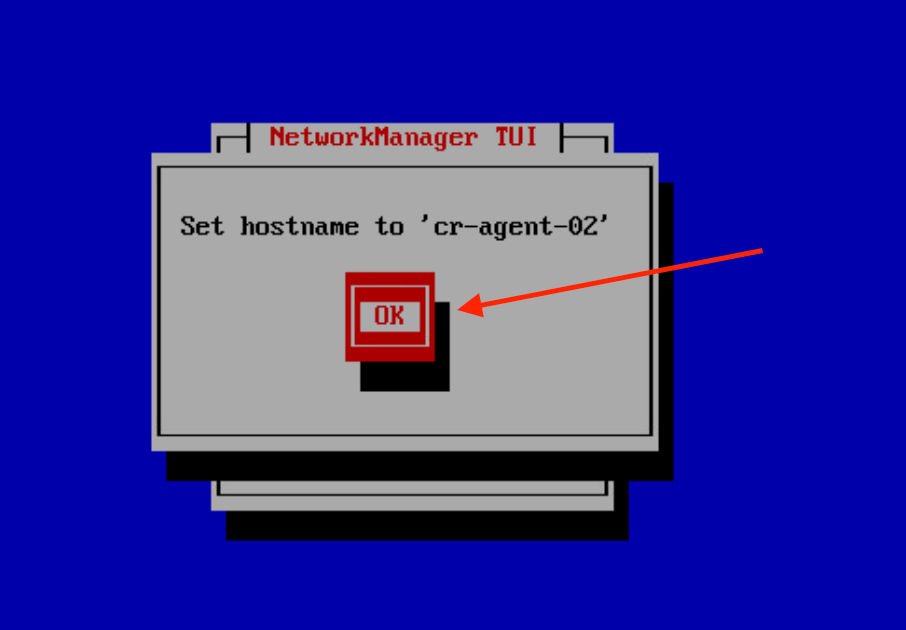 * Users will be returned to the Network Manger window
***
* Navigate to Quit if all changes required in the Network Manager have been made
* Press “Enter” to go back to the main menu
* Users will be returned to the Network Manger window
***
* Navigate to Quit if all changes required in the Network Manager have been made
* Press “Enter” to go back to the main menu
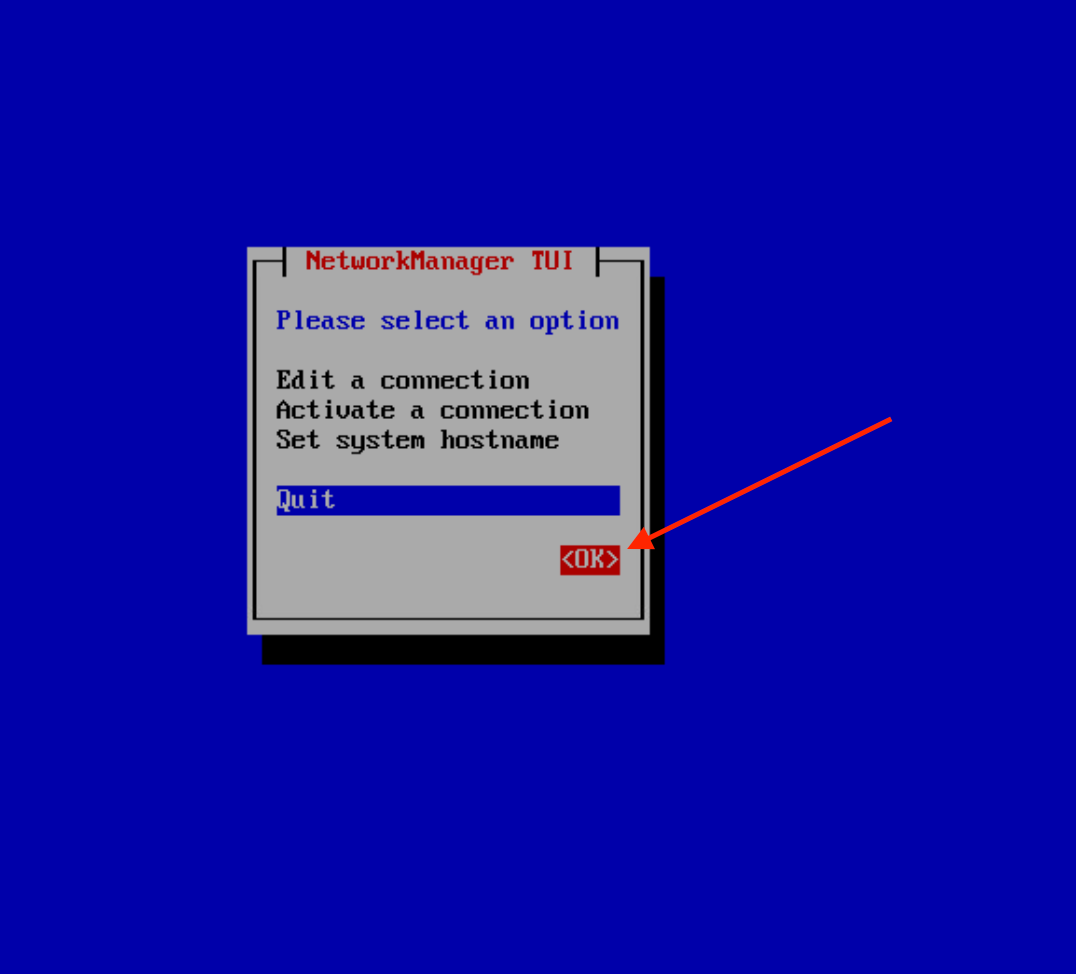 Once back to the Main Menu, any IP changes or Hostname changes made will be applied and visible in the menu GUI.
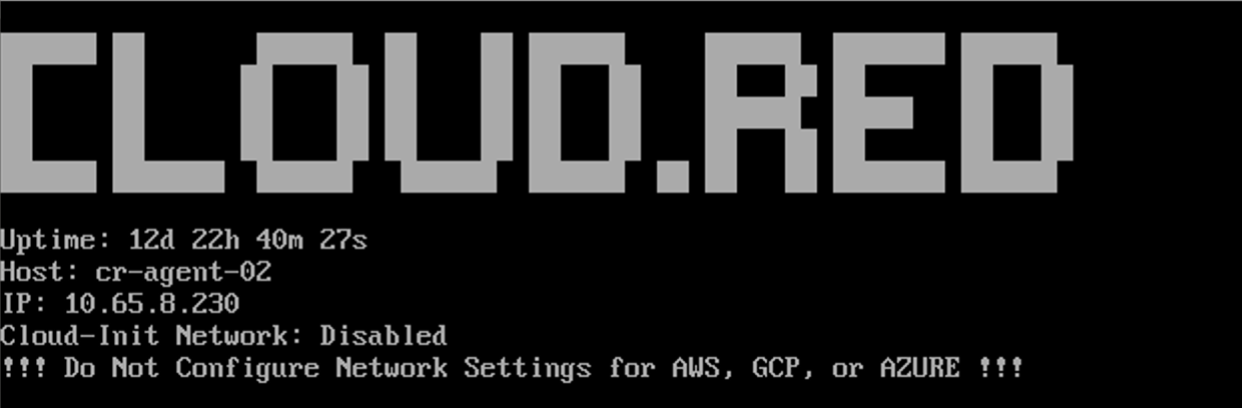 Users should only toggle to 'Disabled' when configuring a static IP address or utilizing DHCP with a reserved IP allocation.\
Once the agent has been onboarded into cloud.red, only change the Cloud-Init Network at the instruction of WorldTech IT.
***
To toggle Cloud-Init Networking, consult the following:
* Use the arrow keys to navigate through the available options on the main menu.
* Highlight the "Cloud-Init Network Toggle" option and press 'Enter' to select it.
The Cloud-Init Network Toggle Menu will appear
Users should only toggle to 'Disabled' when configuring a static IP address or utilizing DHCP with a reserved IP allocation.\
Once the agent has been onboarded into cloud.red, only change the Cloud-Init Network at the instruction of WorldTech IT.
***
To toggle Cloud-Init Networking, consult the following:
* Use the arrow keys to navigate through the available options on the main menu.
* Highlight the "Cloud-Init Network Toggle" option and press 'Enter' to select it.
The Cloud-Init Network Toggle Menu will appear
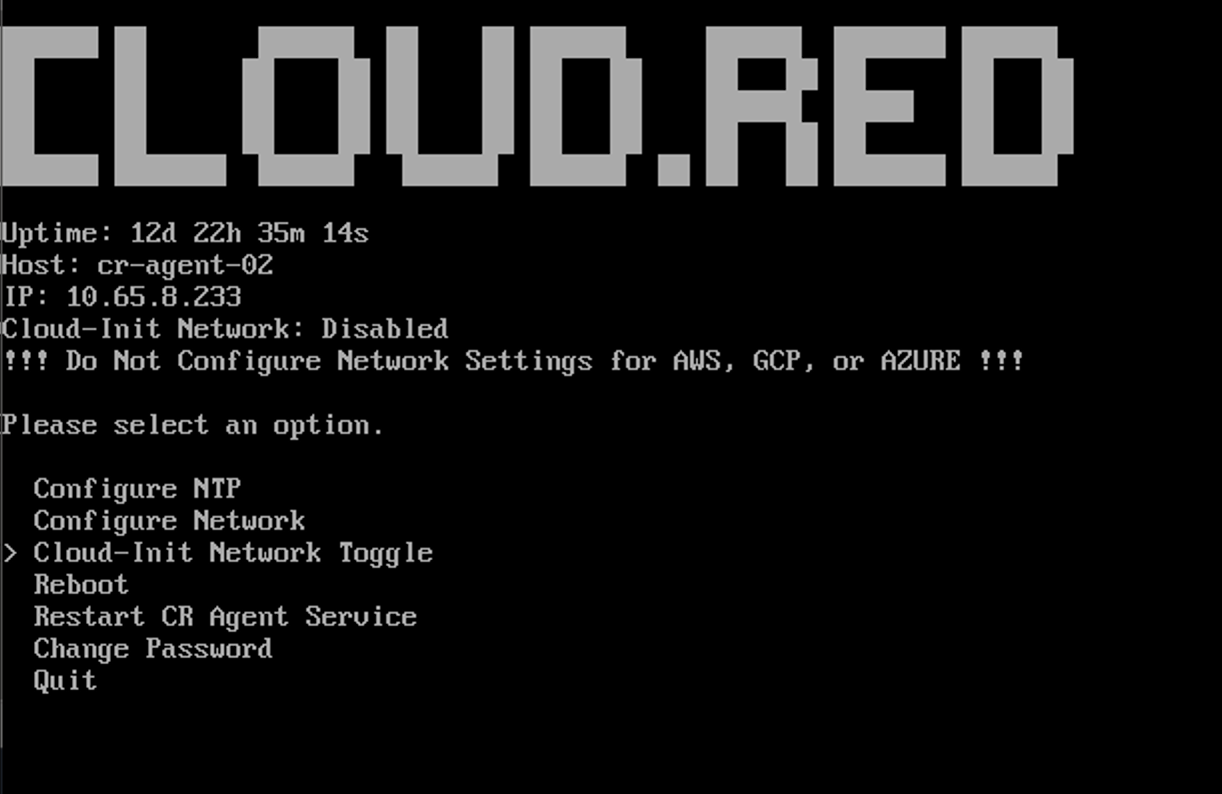 The following options are available:
* **Go Back:** Takes you back to the main menu without making any changes.
* **Enable Cloud-Init Networking:** Enables Cloud-Init Networking on your instance.
* **Disable Cloud-Init Networking:** Disables Cloud-Init Networking on your instance.
To enable Cloud-Init networking, navigate to "Enable Cloud-Init Networking" and press "Enter"
The following options are available:
* **Go Back:** Takes you back to the main menu without making any changes.
* **Enable Cloud-Init Networking:** Enables Cloud-Init Networking on your instance.
* **Disable Cloud-Init Networking:** Disables Cloud-Init Networking on your instance.
To enable Cloud-Init networking, navigate to "Enable Cloud-Init Networking" and press "Enter"
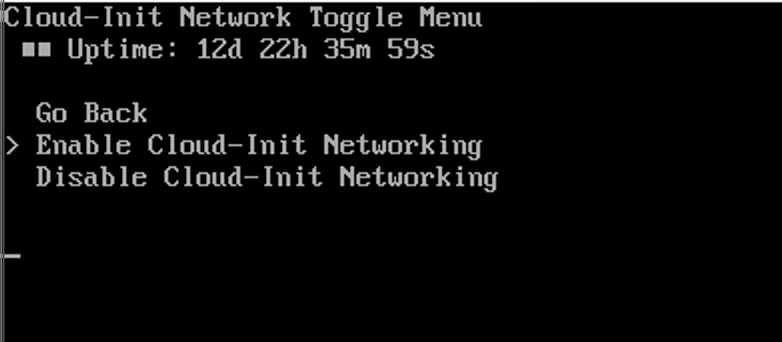 To disable Cloud-Init networking, navigate to "Disable Cloud-Init Networking" and press "Enter"
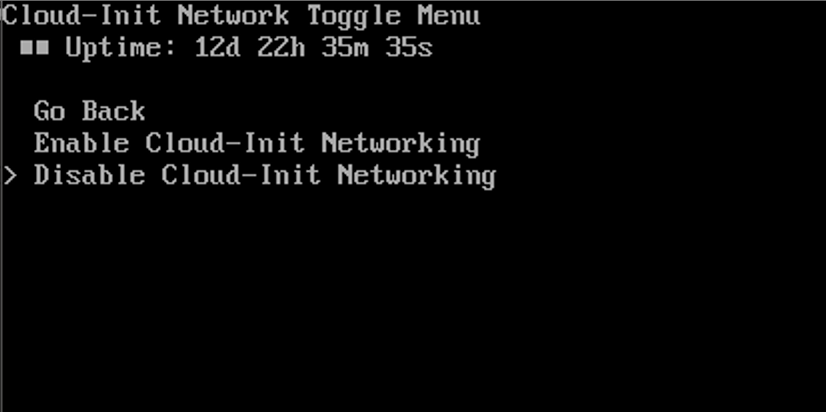 Once all intended changes have been made, navigate to "Go Back" and press "Enter"
Users will be returned to the main menu with the Cloud-Init Network stats configured being reflected in the Menu under IP.
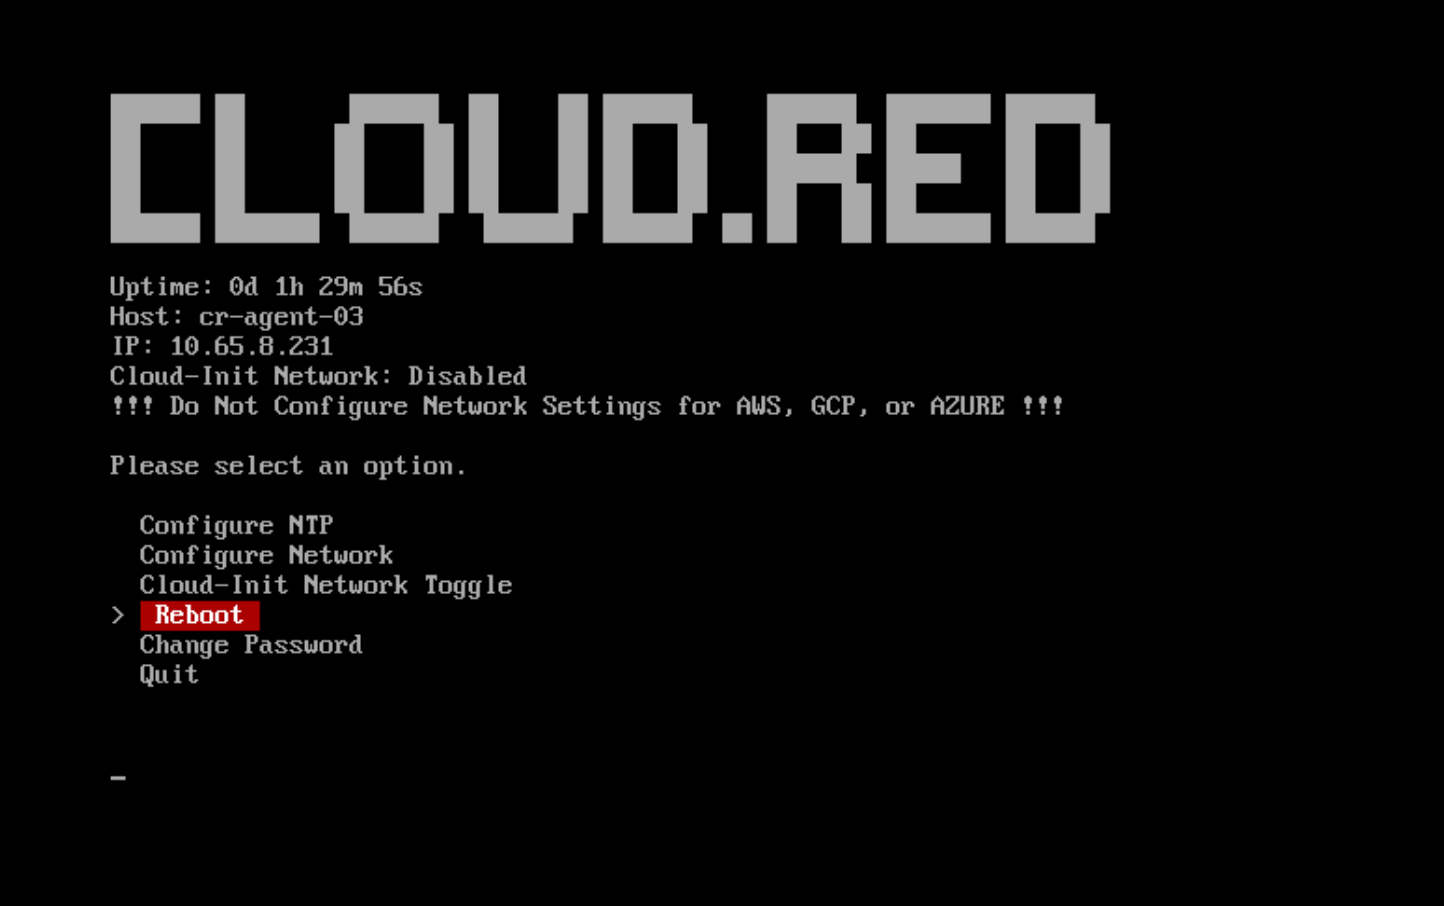
Note: Once the agent has been onboarded into cloud.red, only reboot the device at the instruction of WorldTech IT.
To reboot the VM, consult the following:
* Use the arrow keys to navigate through the available options on the main menu.
* Highlight the "reboot" option and press 'Enter' to select it.
**Note:** Once the agent has been onboarded into cloud.red, only restart the CR Agent Service at the instruction of WorldTech IT.
To Restart CR Agent Service, consult the following:
* Use the arrow keys to navigate through the available options on the main menu.
* Highlight the "Restart CR Agent Service" option and press 'Enter' to select it.
Once all intended changes have been made, navigate to "Go Back" and press "Enter"
Users will be returned to the main menu with the Cloud-Init Network stats configured being reflected in the Menu under IP.
Note: Once the agent has been onboarded into cloud.red, only reboot the device at the instruction of WorldTech IT.
To reboot the VM, consult the following:
* Use the arrow keys to navigate through the available options on the main menu.
* Highlight the "reboot" option and press 'Enter' to select it.
**Note:** Once the agent has been onboarded into cloud.red, only restart the CR Agent Service at the instruction of WorldTech IT.
To Restart CR Agent Service, consult the following:
* Use the arrow keys to navigate through the available options on the main menu.
* Highlight the "Restart CR Agent Service" option and press 'Enter' to select it.
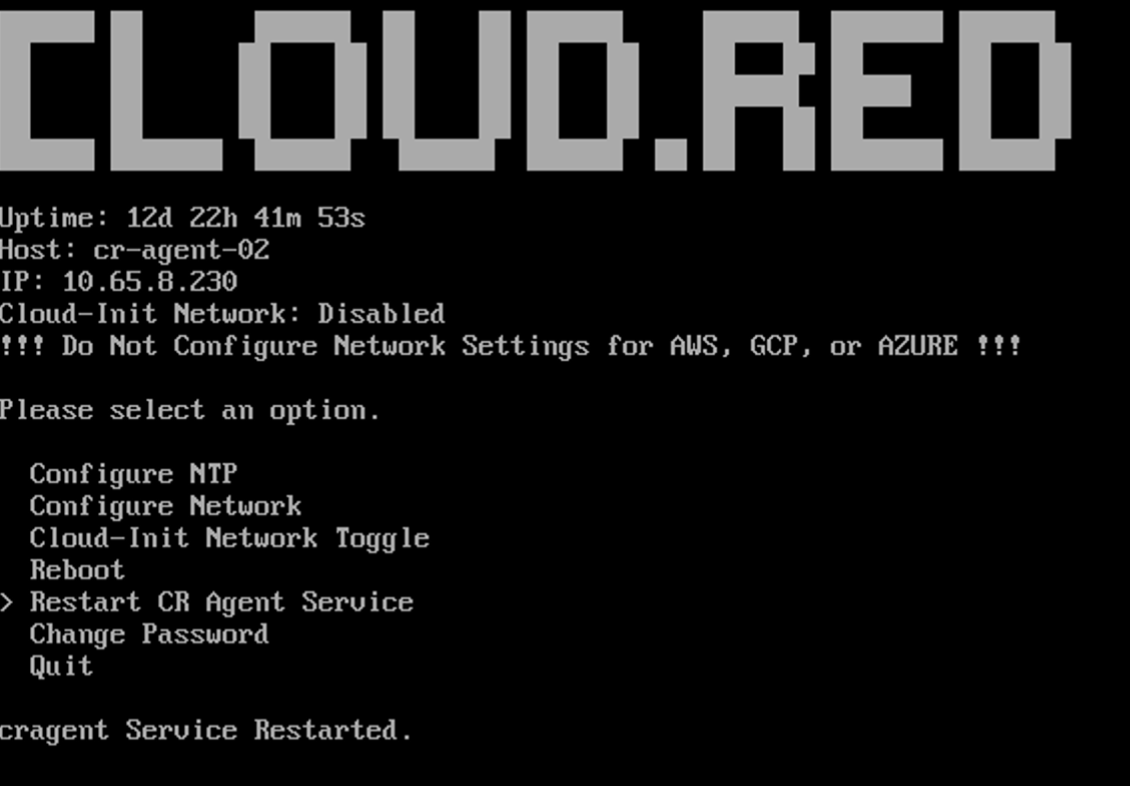 Despite the netadmin account being exclusively accessible via the console, adhering to best practices necessitates altering the default password. It is imperative that you update this password to a more complex alternative and securely store it within your designated secrets or password management system.
**Warning:** Should the password be misplaced, access to the netadmin account for the purpose of modifying settings will be irretrievably lost.
To change the Password for the Netadmin user, consult the following:
* Use the arrow keys to navigate through the available options on the main menu.
* Highlight the "Change Password" option and press 'Enter' to select it.
Despite the netadmin account being exclusively accessible via the console, adhering to best practices necessitates altering the default password. It is imperative that you update this password to a more complex alternative and securely store it within your designated secrets or password management system.
**Warning:** Should the password be misplaced, access to the netadmin account for the purpose of modifying settings will be irretrievably lost.
To change the Password for the Netadmin user, consult the following:
* Use the arrow keys to navigate through the available options on the main menu.
* Highlight the "Change Password" option and press 'Enter' to select it.
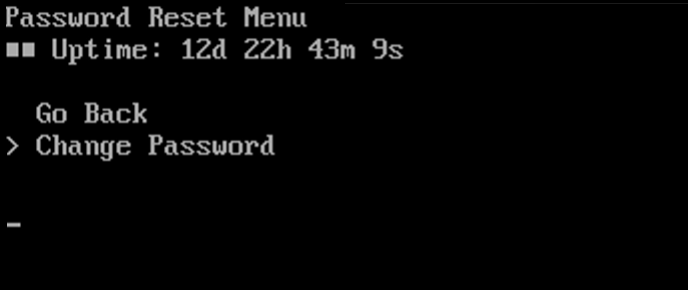
 The "Password Reset Menu" will open.\
Highlight the "Change Password" option in the reset menu and press 'Enter’.
The "Password Reset Menu" will open.\
Highlight the "Change Password" option in the reset menu and press 'Enter’.
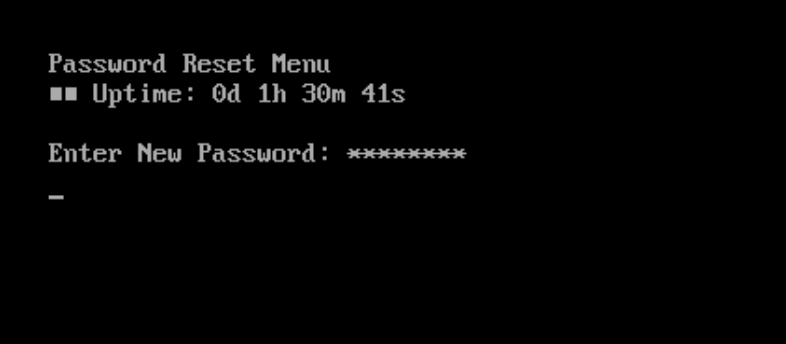
 A prompt to "Enter New Password" will appear.\
Type in the desired password you wish to set for the Netadmin user.
**Note:** The characters will be obscured for security reasons.
Press 'Enter' after inputting the new password.
A prompt to "Enter New Password" will appear.\
Type in the desired password you wish to set for the Netadmin user.
**Note:** The characters will be obscured for security reasons.
Press 'Enter' after inputting the new password.
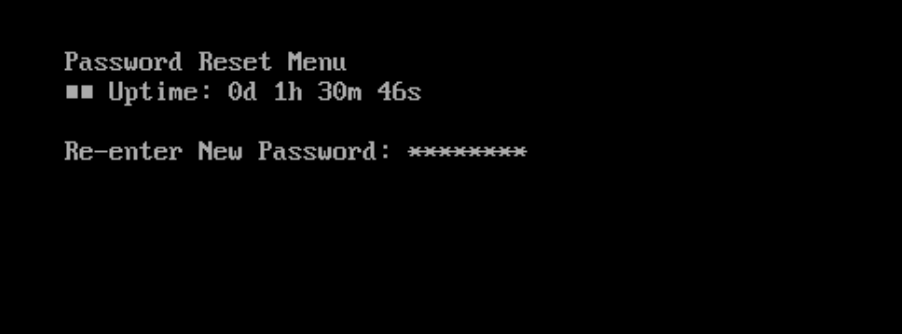
 A prompt to "Re-enter New Password" will appear.\
Type in the same password again to confirm.\
Press 'Enter' after confirming the new password.
A prompt to "Re-enter New Password" will appear.\
Type in the same password again to confirm.\
Press 'Enter' after confirming the new password.
 Confirming the new password returns users to the main menu.
After a successful change of the password, a confirmation message will appear: "Password reset successfully for 'netadmin'".
Confirming the new password returns users to the main menu.
After a successful change of the password, a confirmation message will appear: "Password reset successfully for 'netadmin'".
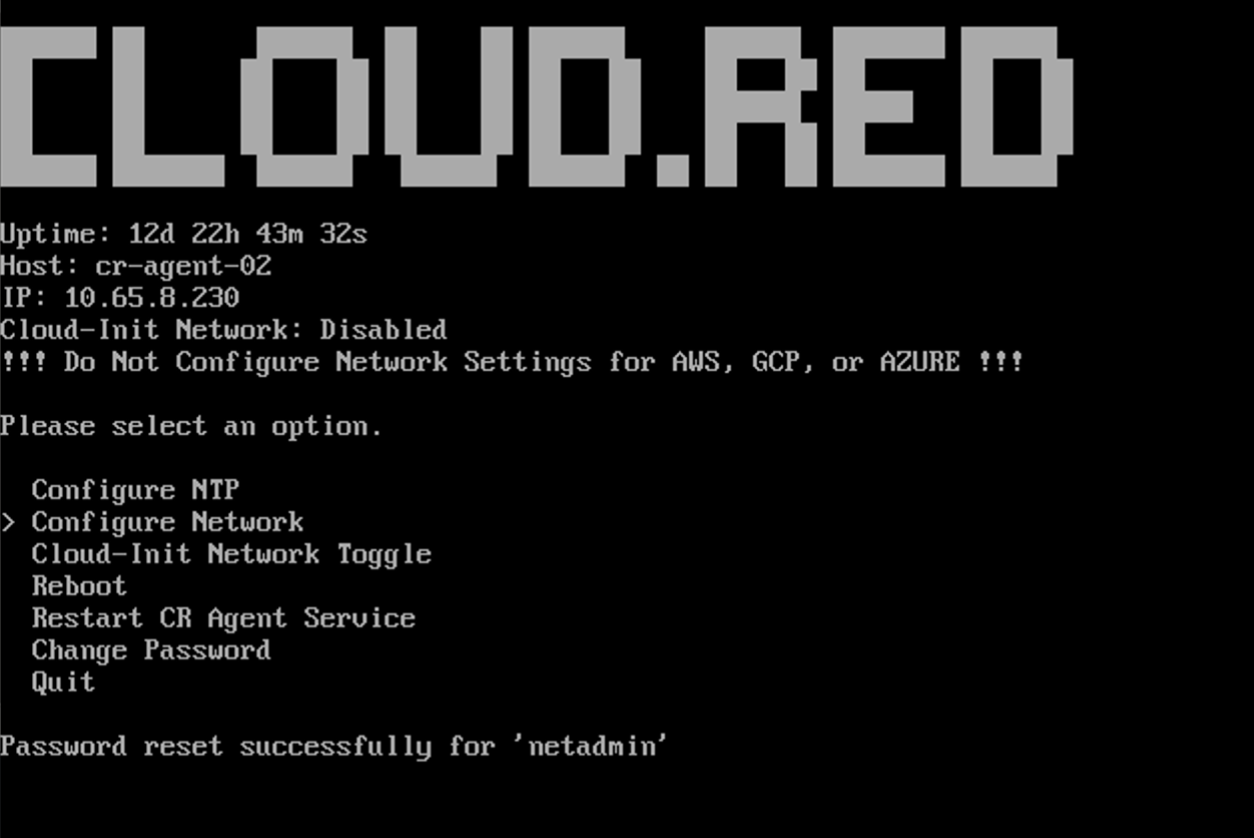 **Before Continuing validate the following is complete:**
* The virtual appliance’s static IP address is correct.
* Cloud-Init is disabled.
* All Network Configurations are correct.
* NTP has been configured correctly.
* The password for Netadmin user has been updated.
**If issues with onboarding the agent occur, take the following steps:**
* Confirm that all [Connectivity Requirements](/requirements/agent-connectivity) are met.
* Restart Cr Agent Service.
* Reboot the VM.
* If issues persist contact WorldTech IT.
***
## Registering the Cloud.Red Agent
To register the device, all previous instructions must be complete and a user must be able to reach the agent’s private IP, over HTTPS on port 443, to register the Cloud.Red Agent.
### Connect to the Agent’s HTTPS Console
In your web browser, visit the IP address of your VM.
**Before Continuing validate the following is complete:**
* The virtual appliance’s static IP address is correct.
* Cloud-Init is disabled.
* All Network Configurations are correct.
* NTP has been configured correctly.
* The password for Netadmin user has been updated.
**If issues with onboarding the agent occur, take the following steps:**
* Confirm that all [Connectivity Requirements](/requirements/agent-connectivity) are met.
* Restart Cr Agent Service.
* Reboot the VM.
* If issues persist contact WorldTech IT.
***
## Registering the Cloud.Red Agent
To register the device, all previous instructions must be complete and a user must be able to reach the agent’s private IP, over HTTPS on port 443, to register the Cloud.Red Agent.
### Connect to the Agent’s HTTPS Console
In your web browser, visit the IP address of your VM.

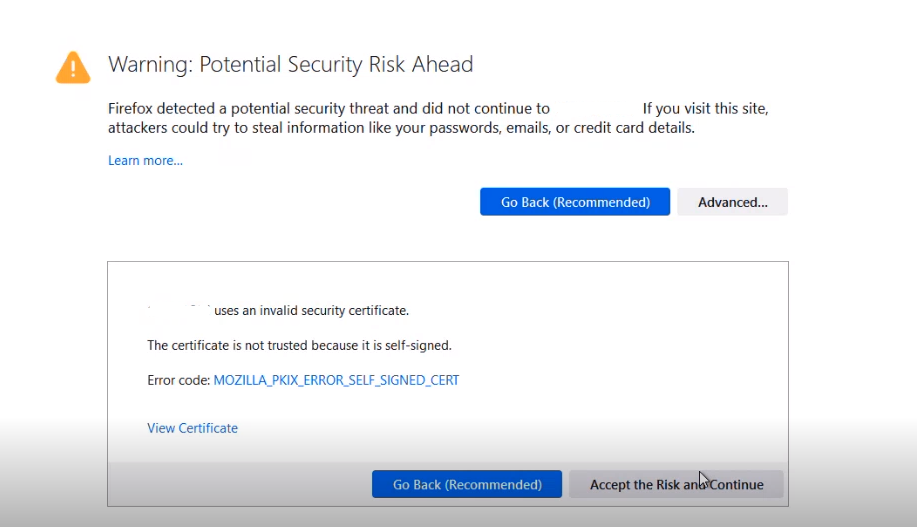
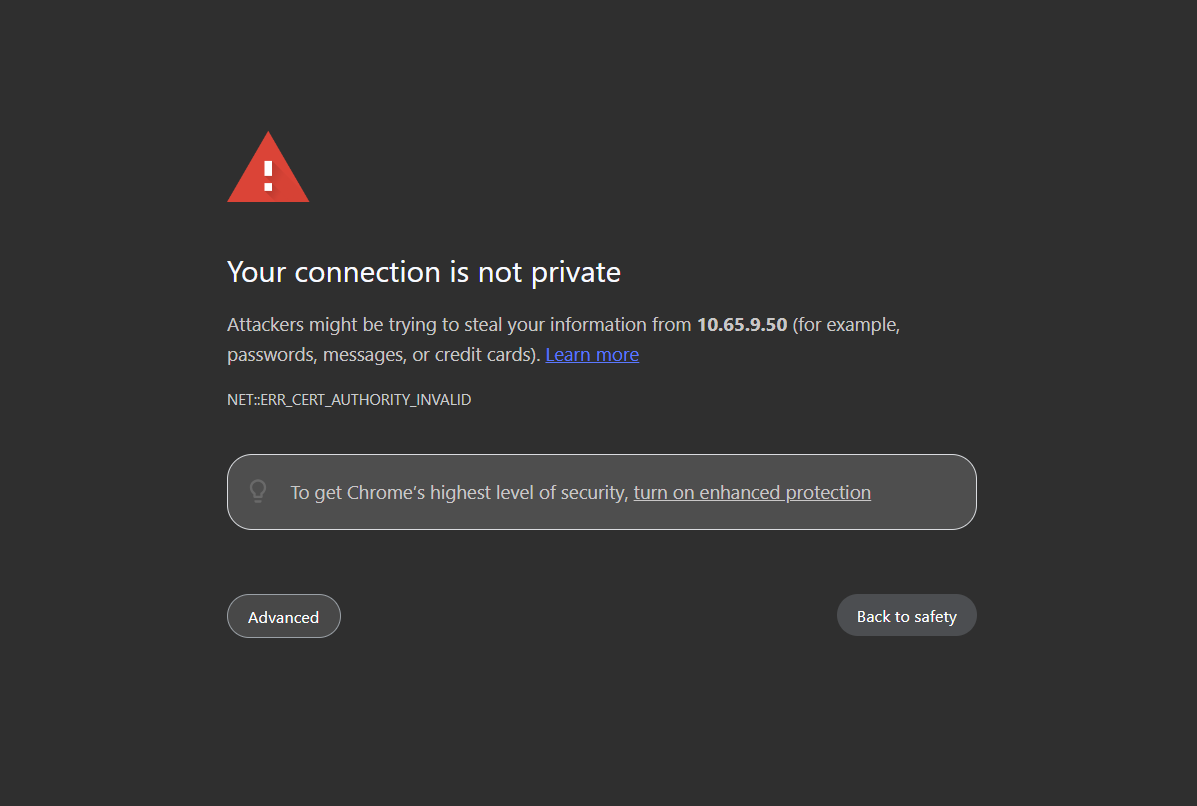
 Accept the potential security risk and continue (this will look different in different browsers)
 ### Continue Registration
Follow one of the following methods:
### Continue Registration
Follow one of the following methods:
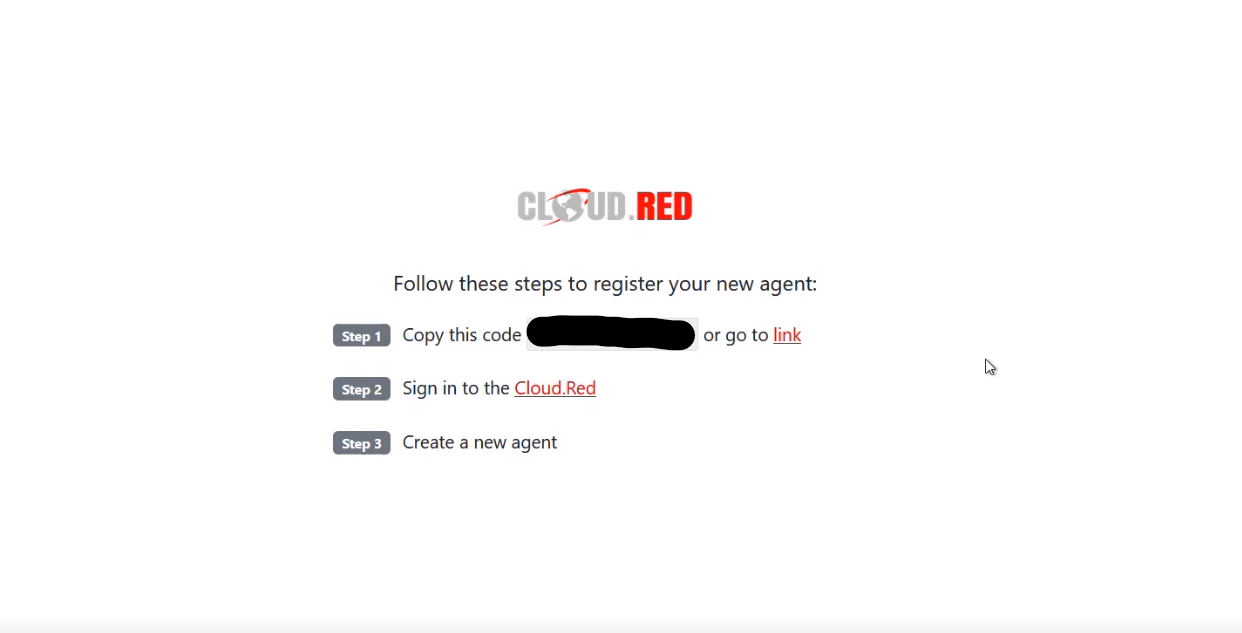 > Click the link at the end of “Step 1”.
* You will be brought to the Cloud.Red Portal.
> Click the link at the end of “Step 1”.
* You will be brought to the Cloud.Red Portal.
* Select your account.
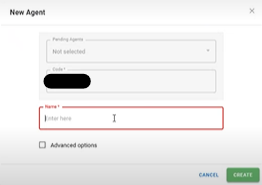
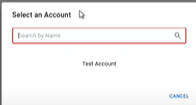 * The agent code will be auto-populated.
* Use the agent name provided to you by your WorldTech IT project manager.
* The agent code will be auto-populated.
* Use the agent name provided to you by your WorldTech IT project manager.
 > Copy the code displayed in the middle of the registration page seen in step 1.
Go to [Cloud.Red](https://portal.cloud.red) and navigate to the agents tab on the left-hand menu.
> Copy the code displayed in the middle of the registration page seen in step 1.
Go to [Cloud.Red](https://portal.cloud.red) and navigate to the agents tab on the left-hand menu.

 * In the top right corner, click new.
* Paste the copied code.
* In the top right corner, click new.
* Paste the copied code.
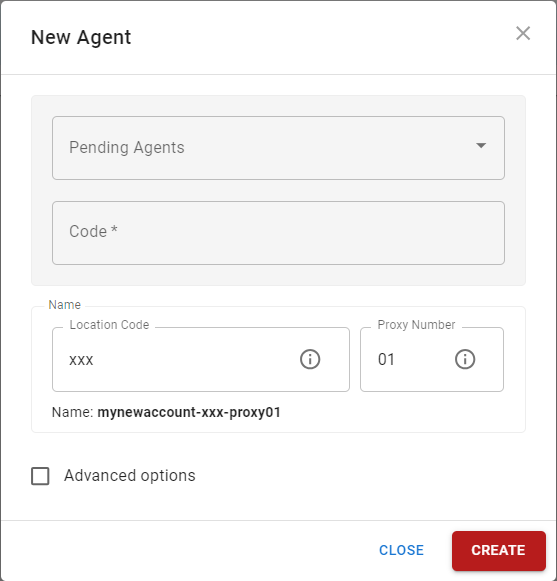
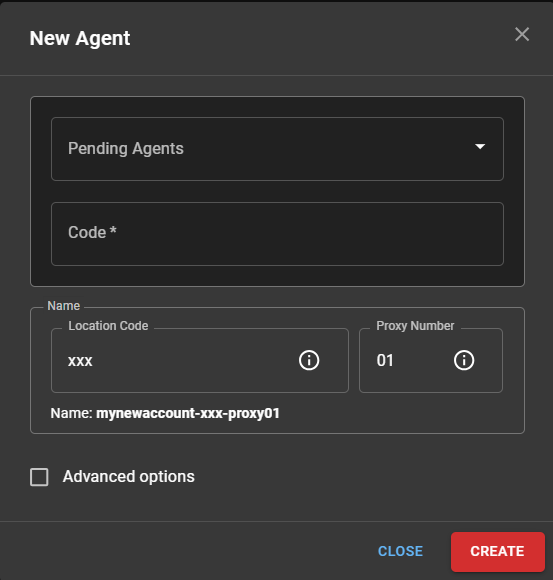 * Use the agent name provided to you by your WorldTech IT project manager.
> **Please contact WorldTech IT to complete the installation.**
* Use the agent name provided to you by your WorldTech IT project manager.
> **Please contact WorldTech IT to complete the installation.**